


New to the world of photography, drone light-painting is enabling photographers to create cutting-edge content using photographer-controlled light from the sky. Drone light-painting is one of the latest editions to my photographic arsenal and is probably one of my favorite mediums - the space exploration, a dystopian sensation that can be created when lighting from the air is one that fuels my creative drive.
My name is Daniel Alpert of Daniel James Photography and in this blog, I’ll be taking you through the production of one of my drone-lit nightscape images.
(View video for visual instruction and read blog below for written details)
As drones have become increasingly available for use in photography, I’ve been inspired to begin photographing locations in a totally new way - by lighting them from the sky. In this tutorial, I will walk you through the processes involved in my drone light-painting technique, including my equipment, preparation, location selection, and field practice - everything you need to know to create your own first drone light-painted image.
Preparation and Location
The first step to creating a drone light-painted image is to choose a location and come up with a shot list of creative compositions. With limited drone and light battery, it is always best to go into a shoot with strong compositions in mind. Photographers must also be careful in selecting locations to shoot, as many areas like national parks and landscapes near airports are under strict drone flight restrictions. To ensure all of my flights are legal, I use Airmaps, an app developed specifically for drone users to allow them to view all flight restrictions in any given area.
Once I’ve chosen my location to shoot and have come up with a strong list of composition ideas, I then prepare and test all of my gear, to minimize time spent troubleshooting in the field. Time is precious when light-painting with a drone as battery life in both the drone and the lights are limited. Flight-time is further limited on a drone when extra weight, like lights and diffusers, are added. I usually only get about 20 minutes of flight time per battery when two lights are mounted with warming gels. Front-end preparations are essential to ensuring one gets the most out of any drone light-painting session.
Gear That I Use
To create a drone-lit image like the ones I’ve done, a few essential pieces of equipment are needed:
- DSLR camera (or one capable of taking long exposure images) - I use a Nikon D850
- Tripod - I use a Silk 340 DX tripod
- Shutter release
- Drone - I use a Mavic 2 Pro. If you'd like to explore the best drones in 2020, see Money Crasher's Article HERE.
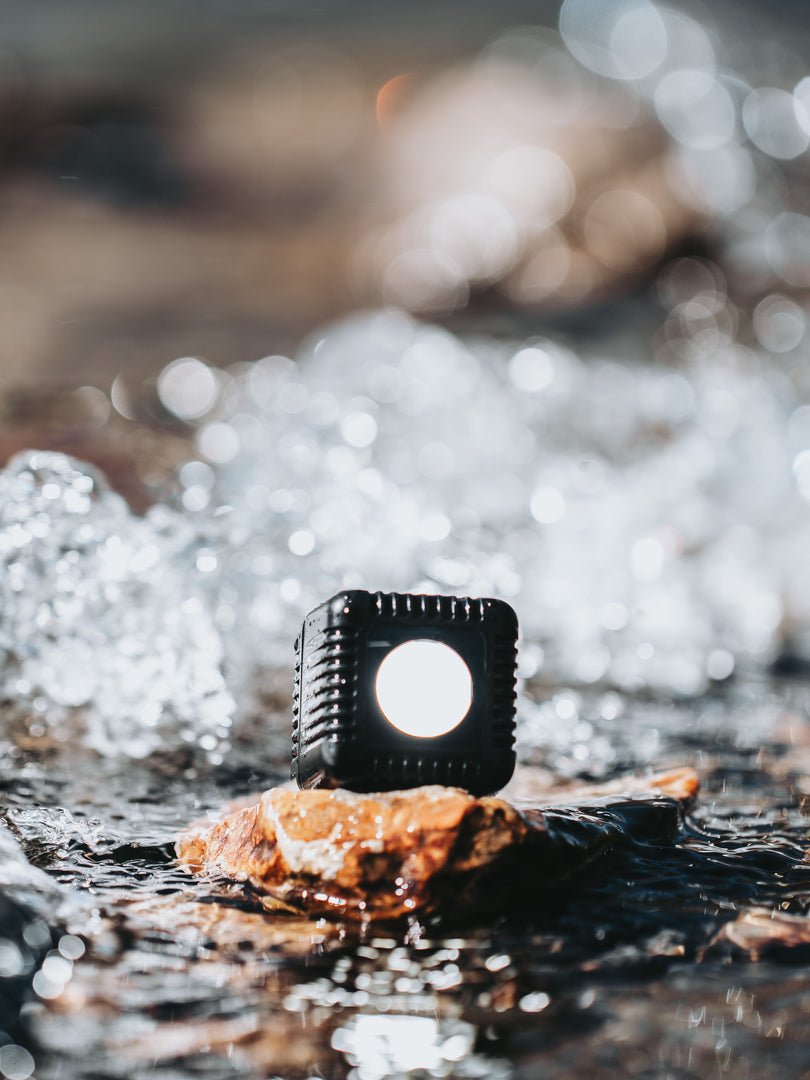
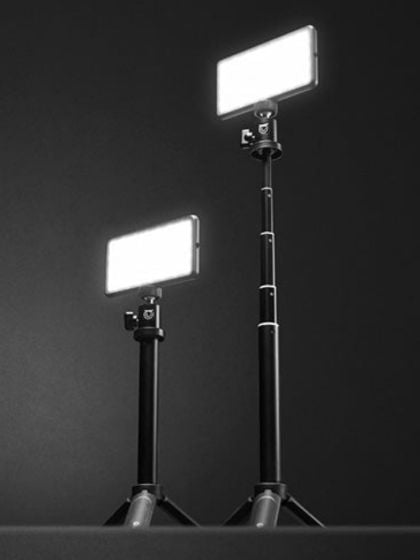
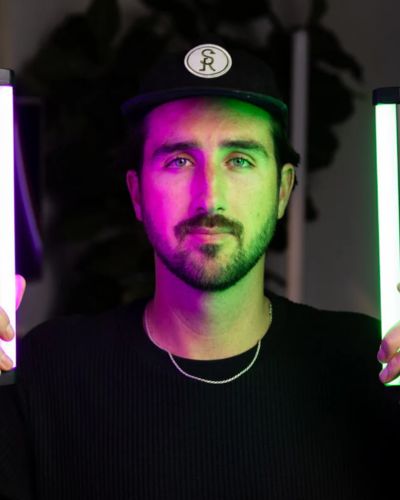
- Bright lights - I use 2 Lume Cube LEDs + diffusers/gels
- Black duct tape (I cover all flight and landing lights on my Mavic Pro 2, as they will show up in and ruin my image if not)
- A way to securely attach the light to the drone
- Extra charged batteries for both my camera and my drone
Finally, I ensure all camera sensors and lenses are clean and clear of all dust particles.

Lume Cube has developed a drone mount to be used specifically for attaching their lights to a variety of drone models, including my Mavic 2 Pro. Before these mounts were available, I used a combination of headlamps and velcro to light-paint with my drone. This combination interfered with my drone’s landing sensors, costing me an expensive drone battery and almost costing me my drone altogether. The Lume Cube Mavic 2 Pro mounts allow me to safely and securely attach two 1,500 lumen Lume Cube LEDs to my drone, which provide more than enough light and in such a way that it does not interfere with the drone’s sensors or balance.

Using Lume Cube LEDs also enables me to use the various Lume Cube accessories available with the lights, such as diffusers, colored gels, and warming gels which attach easily to the lights using magnets. The mounts also allow for total control over light direction. You can point them forward, down, backward - any way you like.
Pre-Shoot Preparation
Light-painting happens primarily at night, so for any drone light-painting expedition, I always arrive at the shooting location a couple of hours early to allow proper time for scouting and set-up. There’s a sweet spot when beginning to shoot drone light-painted images and that takes place approximately 45 minutes after the sun has set, near the ending of nautical twilight. At this time, the sun has set far enough below the horizon that it’s dark enough to light paint, yet the sky is still illuminated with a beautiful retreating blue hour light. A colorful sky can add a very impactful element to any drone light-painted image. Ten minutes before astronomical twilight begins, I start to set up my shot - mount my DSLR and shutter release to my tripod and set my composition. Before firing up the drone, I always take a few test shots in order to be sure my composition is right so that no further tripod adjustments are necessary once I’ve begun to fly.
Once my camera is set and ready to go, I begin to assemble my drone and light set-up, here are the steps that I take:
- Use the black tape to cover the red and green lights so they do not appear on the final light-painted image.
- Secure the Lume Cube drone mounts to the Mavic 2 Pro, before screwing two lights into place.
- Attach any additional accessories. I use CTO Warming Gels on each Lume Cube to warm the color temperature and add a little warmth to my scenes. Lume Cube gels are easily secured by using the magnet-based mounting system.
- Turn your lights on and determine the desired brightness setting. Lume Cubes have 10 brightness settings using the manual buttons or 100 brightness settings through the Lumecube App. I rarely set my lights to their max brightness. This helps me conserve battery life and properly expose my scene.
Now my camera is set, my drone/light set-up is assembled, and I’m ready to fly.
The Light-Painting Process
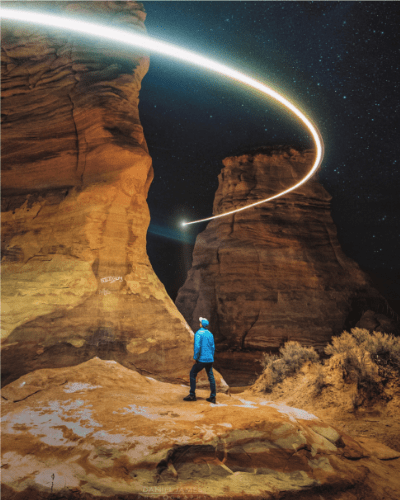
For aesthetics, I enjoy incorporating shapes and circles in my drone-lit images. DJI drones are equipped with a specialized function called Point of Interest, or POI mode. This mode allows the flyer to first set a center point in the location that they choose to be the center of their circle, a radius for their intended circle, and the speed of flight, in order to program the drone to fly in a near-perfect circle. I use this mode to create light-painted halos and floating rings of light.
Since the Lume Cube Mavic 2 Pro mounts allow the user to point their lights in any direction, I tend to point one inward and one outward when painting circles, as it allows me to avoid any thinly lit or blown-out spots in my circle, resulting in even, smooth, perfect halos.
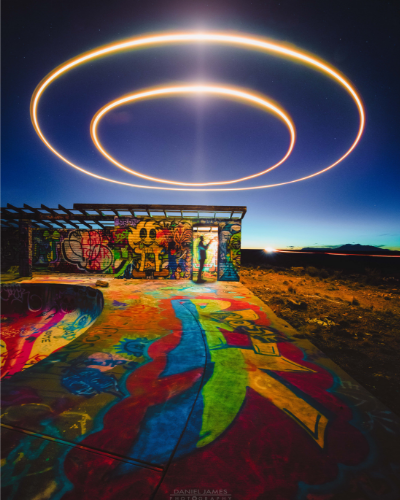

When flying halos, it can be very difficult to set a precise shutter speed that will complete a circle perfectly without creating an unsightly overlap of light in the image. To get around this, the camera can be turned to Time (T) mode, instead of bulb mode. T Mode allows the photographer to press the shutter to start an exposure and then press the shutter again at the exact moment the photographer intends to end the exposure. When using T Mode it is best to use a remote shutter release to avoid camera vibration.

This will hide any gaps or overlapping that occurs at your starting point. In regards to camera settings, exposure times will vary but a good place to start is to put the camera in T mode, open the aperture to F4, and set the ISO to 1600.
Compositions are endless and with the right gear, knowledge, and a little practice, the sky's the limit to what you can create! Creative and innovative imagery can be achieved when mixing the art of light with flight. You should now have everything you need to know to create your very own drone light-painted images. Get creative and get out there!
About Daniel James Alpert
 Daniel is a Phoenix-based photographer cataloging the American Southwest through landscape and astro-photography. Daniel's work features marvelous naturally-occurring phenomena, seldom captured on camera, as a way to depict Earth's cyclical and continually evolving natural allure. Follow him at @danieljames.photography.