


Before using the equipment, please read the user manual carefully and refer to it frequently as needed.
Full Video Transcription Below
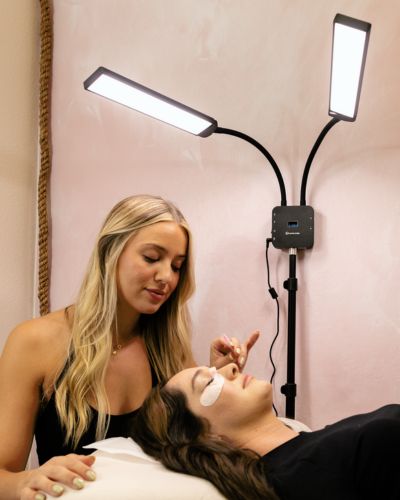
Hey guys, Trevor here to breakdown the must-have lighting tool for photographers, videographers, creators, and filmmakers alike. Meet the Lume Cube Studio Panel Lighting Kit - the powerful, portable, and precise two-point lighting kit with no limits.
The studio Panel Lighting Kit was designed for creators who want ultimate control of their lighting, while keeping their gear lightweight, travel-friendly, and easy to use. Simply put, this is the most effective two-point lighting kit that you could fit into a travel-friendly bag. Because the Studio Panel has an internal battery, you don’t need to rely on traditional power sources to power your light. This combination of light quality, portability, and control allows users to create dynamic lighting effects wherever and whenever they want.
Whether you received the two-light Studio Panel Lighting Kit or just the Studio Panel light, this video will help you get to know your new lights a little better and breakdown how to best use and operate.
_______________________________________________________________________
What’s Included
Before we get into how to use it, I’ll give you a little tour so you know your way around the lighting kit. We’ll start with what comes inside the box!
(2) Studio Panel Lights
(2) Barn Doors
(2) Tilt Mounts
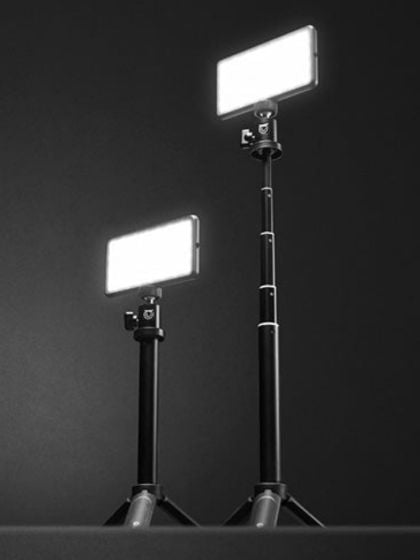
(2) 70" Light Stands
(2) Power Cords
(1) Remote, syncs to control multiple devices
(1) Travel Bag
_______________________________________________________________________
Physical Features
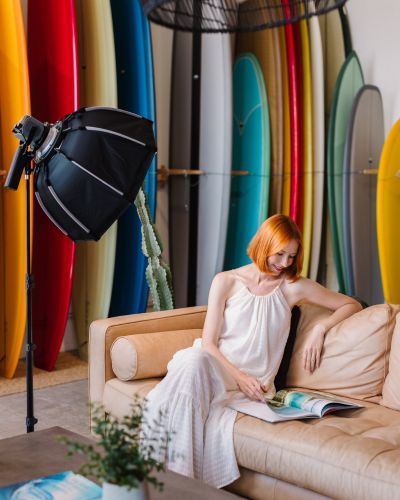
The Studio Panel is one of the larger lights we’ve made here at Lume Cube standing tall at about 10.5 inches wide, by 7.5 inches tall.. That larger the surface area of light the softer and more professional-looking your light’s output will be. Simply put, this thing throws some beautifully diffused light onto your subject.
This is due to the Edge Lit technology inside of the light. We have 200 LEDs shining inward and passing through multiple layers of diffusion and creating a very flattering and soft light output. This also allows us to keep the light very slim, as it’s only 1” thick.
Moving around to the back we have the internal rechargeable battery. This is an absolute game changer. This gives you the option to use the Studio Panel while plugged into power, or you can unplug and use it anywhere as it’s powered from the internal battery source. Most other lights of this kind are either required to be plugged into a power source, or if they are battery powered, you need those big clunky external batteries which I either break or lose before it’s time to use them. Simply put, this battery powered system is just easy to use and seamless. It’s one less thing you have to worry about.
Keep in mind, You can run your Studio Panels for about an hour and a half at full power while using battery power.
On back you’ll also notice the back screen and side controls. This is where you will monitor, adjust and control your light output. To touch on the controls, we have a brightness dial, a color temperature dial, a power switch, and your power port to recharge your light. The screen will display your brightness settings, adjustable from 1%-100%, your color temperature, adjustable from 3200k to 5600k, and your battery life. Assuming you’re using the batter power, the battery life indicator is especially helpful because it shows how much juice you have left at the given brightness setting. As you increase brightness, that time remaining will decrease. The more output, the less run time you’ll have. But this really helps avoid your light dying unexpectedly during a shoot.
On the bottom of your light, you’ll find the ¼ 20 thread. This is where you will connect your light to a light stand, or the included angle mount.
_______________________________________________________________________
How To Use
Now that we know our way around, lets get into how to use it. First attach the angle mount to the ¼ 20 thread on the bottom of your Panel. This will give you extra flexibility when angling the direction of your light. Next, set up your light stand or mounting option. If you have the Studio Panel Lighting Kit, use the light stand included in the box. Then, mount your Studio Panel via the bottom of the snake mount to the light stand.
You can then mess around with the angle of your light. Use the angle mount to shine your light downward, upward, or straight forward.
Then, it’s time to power up your Studio Panel. Grab your power cable, plug into your power source, and insert the other end into the power port on side of the light.
Keep in mind, once you plug in, you can start using your Studio Panel right away. But as long as it is plugged in, the internal battery will be recharging. It takes a little over 2 hours to fully recharge your studio panels.
Next, press the power switch and your light will turn on. Take a look at your back control screen.
As mentioned, you can adjust both the brightness and the warmth of your light. Use the top dial to adjust the brightness, and the bottom dial to adjust the warmth. And you can see these changes being reflected on the back screen.
One of the best parts about the Studio Panel is the Barn Doors. If you get the two light kit, they’re included. If not, you can buy separately.
The barn doors are great at controlling the beam angle of your light. So say you’re filming an interview of someone and you want to draw your viewers eye to your subject.. You’ll want your light to hit your subject, and nothing else. You can adjust the barn door to remove light from hitting the background, and just hit your subject. You can also use these to get creative and create shadows, lines of light, etc. The barn doors simply clip onto the front of your light like so.
Whether you bought the full kit, or just the light itself, you should receive a remote in the box. This remote is an easy way to wirelessly control your lighting. I think this is super handy when you’re all set up, ready to shoot, and you want to adjust your light in real time to see how the changes made on the remote effect what you’re seeing in your camera.
Your remote has been pre-connected to your light, so as long as your studio Panel is on, your remote should work right out of the box.
If not, follow these instructions:
- On remote, press and hold CH button until red indicator light starts flashing.
- On studio panel, press and hold CH button for 2 seconds until the small H on your screen starts flashing.
- On the remote, use the brightness increase/decrease to select a channel from H1-H9 (you have 9 options, H1 to H9).
- Then, simultaneously hold the CH button on both the Studio Panel and your remote to connect.
On the remote, you can adjust brightness and color temperature using the white pad.
- Below the pad, we have some hot keys to make quick adjustments.
- Tap the color temp buttons to quickly change your light from warm to white
- Or tap the brightness buttons to quickly adjust brightness from ¼, half, or full brightness.
- You can also turn the light on and off using the power button. But if you want your light to fully shut down, make sure you physically turn the light off using the switch on board.
Well there you have it, a breakdown of how to use the Lume Cube Studio Panels.
Care
Safety Regulations and Instructions for Use
1. Use the device in a suitable environment. Operating temperature: -10°C to 40°C. Operating humidity: 65% ± 10%.
2. During use, keep the device away from heat sources and high voltage. Prevent children from playing with the device. Do not drop or strike the device.
3. The device contains a built-in battery. Do not disassemble the device or expose it to moisture to prevent dangers.
4. When not in use for extended periods, store the device properly. Maintain the battery at a half-charged state—neither fully charged nor fully discharged.
5. After use, store the device securely to prevent direct contact with metal or foreign objects, which may damage circuits or the battery. Keep the device in a cool, dry place.
6. Do not use in humid environments.
7. Dispose of discarded devices safely and properly. Do not burn or submerge in water.
8. This product contains batteries. Strictly adhere to relevant operating procedures for battery use, as failure to do so may result in dangers or fire.
Danger Warning
- Do not disassemble the device. The device contains a built-in battery with internal protective mechanisms and circuits designed to prevent dangers. Improper disassembly may damage these protective functions, leading to overheating, smoke emission, deformation, or burning.
- Do not short-circuit the circuitry or battery. Do not store or transport the device with metal objects. If circuits or batteries are short-circuited, it may damage the device or batteries, causing the device to overheat, smoke, deform, or burn.
- Do not heat or burn the device. Heating or burning may cause circuitry or battery separators to melt, safety features to fail, or electrolyte to ignite. Overheating can result in the device becoming hot, emitting smoke, deforming, or burning.
- Avoid using the device near heat sources. Do not use the device near open flames, ovens, or in environments exceeding 80°C (176°F). Overheating may cause internal short circuits, leading to the internal battery overheating, smoking, deforming, or burning.
- Do not expose the device to moisture. Do not get the device wet, and never submerge it in water. Doing so may cause the internal protective circuitry to fail and trigger abnormal chemical reactions, potentially leading to overheating, smoke emission, deformation, or burning. After the equipment has been exposed to water or rain, please stop using it.
- Avoid charging or using the device near open flames or in direct sunlight. High temperatures may cause the internal protection circuit to fail and trigger abnormal chemical reactions, potentially causing the device to overheat, smoke, deform, or burn.
- Use the dedicated adapter and charge correctly. Using non-dedicated chargers to charge the device is dangerous. Charging under abnormal conditions may cause the device's internal protection circuits to fail and trigger abnormal chemical reactions, potentially leading to overheating, smoke emission, deformation, or burning.
- Do not damage the device. Do not use metal tools to pry into equipment or circuits, strike equipment with hammers, drop equipment, or damage equipment by any other means. Doing so may cause the equipment to overheat.
- Never charge the device using other power sources or car cigarette lighters. Connecting to high-voltage or high-current power sources may damage the circuitry or battery, causing the device/battery to overheat, smoke, deform, or burn.
- Do not directly touch leaking batteries. If internal batteries leak, the spilled electrolyte can cause skin irritation. If electrolyte gets into your eyes, rinse them immediately with clean water. Do not rub your eyes, and seek medical attention promptly.
Warning - This device contains a built-in battery and should be kept out of reach of children. Place the device where children cannot access it to prevent play or improper handling.
- Do not leave the device connected to the charger for extended periods. Abnormal charging may cause the battery to overheat, smoke, deform, or burn. Unplug the power source after charging is complete. Do not leave the device connected to the charger for long periods to avoid dangers.
- Do not place in microwave ovens or other pressure vessels. Instant heating or structural damage may cause the battery to overheat, smoke, deform, or burn.
- Keep leaking batteries away from fire. If battery leakage (or an unusual odor) is detected, immediately move the battery away from any fire source. Leaking electrolyte may burn or cause other dangers.
- Do not use under abnormal conditions. If the device emits an unusual odor, shows deformation, discoloration, or distortion, discontinue use immediately. Using a malfunctioning device may cause overheating, smoke emission, deformation, or burning.
-
Do not use in unattended environments. When not in use, turn off the device and unplug the power source. Never operate it in an unattended environment to prevent accidents or dangers.
Important Notes - Do not Use the Device in Direct Sunlight. Avoid operating the device under intense sunlight exposure to prevent overheating, deformation, or smoke emission. This helps maintain device performance and prolong its lifespan.
- Anti-Static Measures The device incorporates protective circuitry to prevent various malfunctions. However, avoid using it in static-prone environments, as static electricity (99V or higher) can damage the protective board. This may cause abnormal operation, overheating, deformation, smoke emission, or fire.
- Charging Temperature Range The recommended charging temperature range is 0-30°C. Charging in environments beyond this range may cause reduced device performance and shorten its lifespan.
- Charging Method Use the dedicated power supply to charge the device under the recommended environmental conditions.
- First Use If any unusual odors or other abnormalities are detected during the first use of the device, discontinue use immediately and return the device to the seller.
- Not for Use by Children Children should use the device under parental guidance and supervision, and their usage should be monitored for correct operation.
- Keep Children Away from the Device This device contains a built-in battery and should be kept out of children's reach.
- Warranty Period The warranty period is one year from the date of manufacture. However, the manufacturer will not provide free replacement for issues arising from improper use rather than quality defects, even within the warranty period. After a certain period of use, battery performance may diminish and capacity may decrease, which is a normal phenomenon. If the battery's operational time falls below 50 minutes (with remaining capacity below 60%), it is recommended to stop using the device and dispose of the battery.
Storage - 1Storage Temperature and Humidity Store equipment in a clean, dry, well-ventilated indoor environment with ambient temperatures between -20°C and 45°C and relative humidity between 25% and 75%. Avoid contact with corrosive substances and keep away from fire sources and heat sources.
- Extended Storage For long-term storage, equipment should be kept within a temperature range of -10°C to +30°C, in a low-humidity environment free from corrosive gases.
- When equipment is stored for over three months, perform one full charge-discharge cycle on the battery.
Have any further questions we didn’t cover? Send us a message on social, reach out to support@lumecube.com, or comment in our Lume Cube community group on facebook. We’ll see you next time.